Guide to AWS Auto Scaling
By abdulmumin yaqeen
on August 27, 2024

Guide to AWS Auto Scaling
What is an Auto Scaling Group?
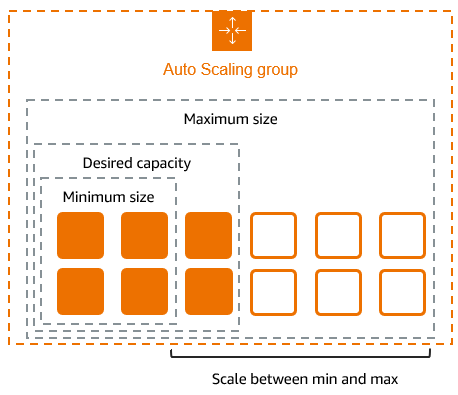
An Auto Scaling group is a collection of Amazon EC2 instances that are treated as a logical grouping for the purposes of automatic scaling and management. These groups allow you to automatically adjust the number of EC2 instances in response to changing application demands, ensuring that you have the right number of instances available to handle the load at any given time.
Key Benefits:
- Cost Optimization: By dynamically adjusting capacity, you only pay for the resources you need, when you need them.
- Improved Availability: Auto Scaling can automatically replace unhealthy instances, enhancing your application's reliability.
- Scalability: Seamlessly handle traffic spikes without manual intervention.
- Flexibility: Customize scaling policies to match your specific application requirements.

How Auto Scaling Works:
Auto Scaling continuously monitors your applications and automatically adjusts capacity to maintain steady, predictable performance at the lowest possible cost. Here's a breakdown of the process:
- Define Launch Template or Configuration: Specify the EC2 instance type, AMI, security groups, and other parameters.
- Set Desired Capacity: Determine the initial number of instances you want running.
- Configure Scaling Policies: Set rules for when to scale out (add instances) or scale in (remove instances).
- Monitor Metrics: AWS CloudWatch monitors specified metrics (e.g., CPU utilization, network traffic).
- Execute Scaling Actions: When thresholds are breached, Auto Scaling automatically adjusts the number of instances.

Implementing Auto Scaling:
Step 1: Sign into the AWS console To begin, sign into the AWS console using your credentials.
Step 2: Search and select EC2 In the search bar, type "EC2" and select it from the dropdown menu.

Step 3: Create an Auto Scaling Group Scroll down on the left-hand side and click on "Create Auto Scaling Group".
Step 4: Configure Auto Scaling Group Give a name for the Auto Scaling Group and hit the launch template button.

What is a launch template?
A launch template is a pre-configured set of parameters for EC2 instances. It streamlines the instance creation process by storing:
- AMI selections
- Instance types
- Security group settings
- And other key configurations
Benefits:
- Time-saving: Avoid repetitive manual setup
- Consistency: Ensure standardized instance configurations
- Versioning: Maintain multiple template versions for different needs
- Flexibility: Easily modify and reuse configurations
Step 5: Creating a Launch Template: Click on "Create Launch Template" to open a new tab. Give the template a name and description.

Step 6: Customize the Launch Template Select an AMI image for your EC2 instance and choose an instance type. Create a security group to control inbound and outbound traffic.

we went with the Ubuntu AMI

In the image above, we the t2.micro instance type, which is suitable for this demo and falls under the free tier usage.

"Create a key pair". A key pair is essential as it enables SSH access into our instance.

Enter a name for your key pair, and click "Create". This action will prompt the download of a .pem file. It is recommended to download the file to a directory that you can easily access.
Next, scroll down to network settings:

We have opted to create a new security group, which acts as a firewall, controlling the network access to our server/instance.
In the image above, we have provided a name for our security group, entered a description, and selected the VPC where the server/instance will be created.
Next, we add the rules for our security group:

In our security group configuration:
Rule 1 allows SSH access from our specific IP address, using the default port 22.
Rule 2 permits internet access over the HTTP protocol (port 80) from any source.
Rule 3 does the same as Rule 2 but for HTTPS (port 443).
Click the "Create launch template" button on the right side. Upon successful creation, you will see a confirmation screen with relevant details.

Congratulations on creating the launch template! Now, let's continue creating the auto-scaling group using the recently created launch template.
Step 7: Return to Auto Scaling Group Creation Go back to the previous tab and click the refresh button. Select the launch template you just created. Then click next.

Step 8: Configure Instance Launch Options
Choose the VPC in which you want to launch your resources. Select the desired availability zones.

In the image above, we have selected the default VPC. Normally, you would choose the VPC where you are launching your resources. Additionally, we have selected the availability zones US-east-1a and US-east-1b. Our instance will span across these zones, enhancing redundancy.
Click the "Next" button to move to the next step.
Step 9: Configure Advanced Options In this step, we will attach a new load balancer that distributes traffic across your EC2 instances. Provide a name for the load balancer and select the "Internet-facing" option to receive traffic from the internet. Refer to the image below for visual guidance.

Now, scroll down on the same page to the network mapping area, where you will find the pre-selected availability zones (AZs). Choose the subnets within these AZs.
Additionally, in the Listeners and routing section, select the "Create a target group" option to define a group of instances that will receive traffic from the load balancer. Refer to the image below for reference.


Lastly, scroll to the health check section, enable health checks and set a grace period of 300 seconds (you can adjust the duration as per your preference). The grace period allows for ignoring any health check failures immediately after instance launch, giving the instances time to stabilize before being marked as unhealthy.

Click the "Next" button to move to the next step.
Step 10: Configure Group Size and Scaling Policies
In this step, you will specify the number of instances you want in your Auto Scaling Group. Set the desired capacity, which represents the number of instances you want to maintain at any given time. Define the minimum and maximum capacity, ensuring your Auto Scaling Group operates within your desired bounds. See the image below:

Furthermore, we would create scaling policies based on metrics such as CPU usage. These policies determine when to add or remove instances, ensuring optimal performance and resource utilization
Step 11: Add Notifications: This step is optional, so we would skip it for now. Click the "Next" button to move to the next step.
Step 12: Add Tags: In this step, we include tags to our Auto Scaling Group for better organization and management.
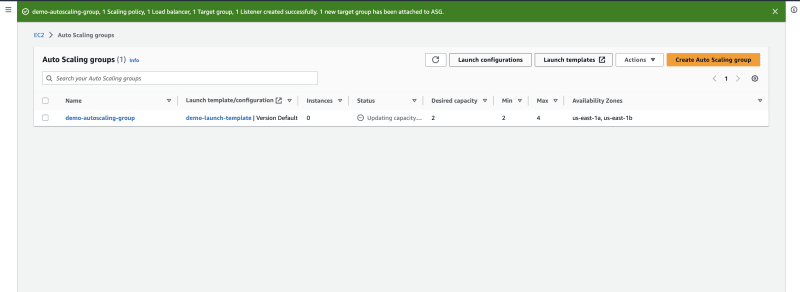
Step 13: Review and Confirm: Before proceeding, please take a moment to review the options you have selected in the previous steps and ensure their accuracy. Once you have confirmed everything, click the "Create Auto Scaling Group" button to finalize the process.

If everything is set up correctly, you should see a result similar to the image below:
Step 14: Testing the Setup Navigate back to the EC2 dashboard.

Click on the instance ID to access the instance details.

Copy the instance's public IP address and test it in your browser. Your server should be up and running;
Step 15: Testing the Load Balancer Access the Load Balancer section from the left-hand side menu. Copy the Load Balancer DNS and test it in your browser.

To observe the load balancer in action, refresh your browser multiple times. You will notice that the instance ID changes periodically as the load balancer dynamically distributes traffic between the instances created by the Auto Scaling Group.
Congratulations! You have successfully implemented auto scaling on AWS 🎉.
Best Practices:
- Use Target Tracking Policies: These policies are easier to set up and often more effective than simple or step scaling policies.
- Implement Gradual Scaling: Avoid dramatic changes in capacity to prevent potential service disruptions.
- Leverage Multiple Metrics: Combine CPU utilization with custom application metrics for more accurate scaling decisions.
- Test Thoroughly: Simulate various scenarios to ensure your Auto Scaling configuration behaves as expected.
- Monitor and Refine: Regularly review your Auto Scaling performance and adjust as needed.
Advanced Considerations:
- Scheduled Scaling: Set up recurring schedules for predictable traffic patterns.
- Lifecycle Hooks: Perform custom actions before instances are terminated or put into service.
- Warm Pools: Maintain a pool of pre-initialized instances to improve application scaling speed.
- Integration with AWS Services: Combine Auto Scaling with services like Elastic Load Balancing and Amazon RDS for a comprehensive scalable architecture.
Conclusion:
Auto Scaling groups are essential to building resilient, cost-effective applications in AWS. By automatically adjusting capacity to meet demand, they enable you to optimize resource utilization while maintaining high availability and performance.
Illustration:
